
These very hot days after the announcement of Knowledge base refinements, we equipped ourselves with A/C, ventilators, and whatever else we could find to roll out much-anticipated email updates before the autumn high season kicks in.
Now, you can make your email workflow more structured, automatically organizing incoming messages based on the recipient, sender, or subject. Plus, we introduced a new setting that controls how the Email tab behaves in the Inbox.
We’ve made all these changes to introduce a full-cycle, comprehensive email ticketing system that you can set up to work alongside chat messages in a single, unified help desk solution.
🔀 Email assignment rules: To, from, and subject conditions
You can now set up new conditions for chat assignment rules based on incoming email fields.
⚙️ How do new assignment rules work?
Assignment rule conditions now include a new default category, Incoming emails, which contains 3 new filters:
- Email from
- Email to
- Email subject
These conditions are evaluated against the first message in the chat. If it’s an email, the “Email from”, “Email to”, and “Email subject” values are taken directly from it. If the chat started from another channel (widget, messenger), Incoming emails rules won’t apply.
These conditions use standard string operators as for other conditions: equals, not equals, contains, does not contain, is known, is unknown.
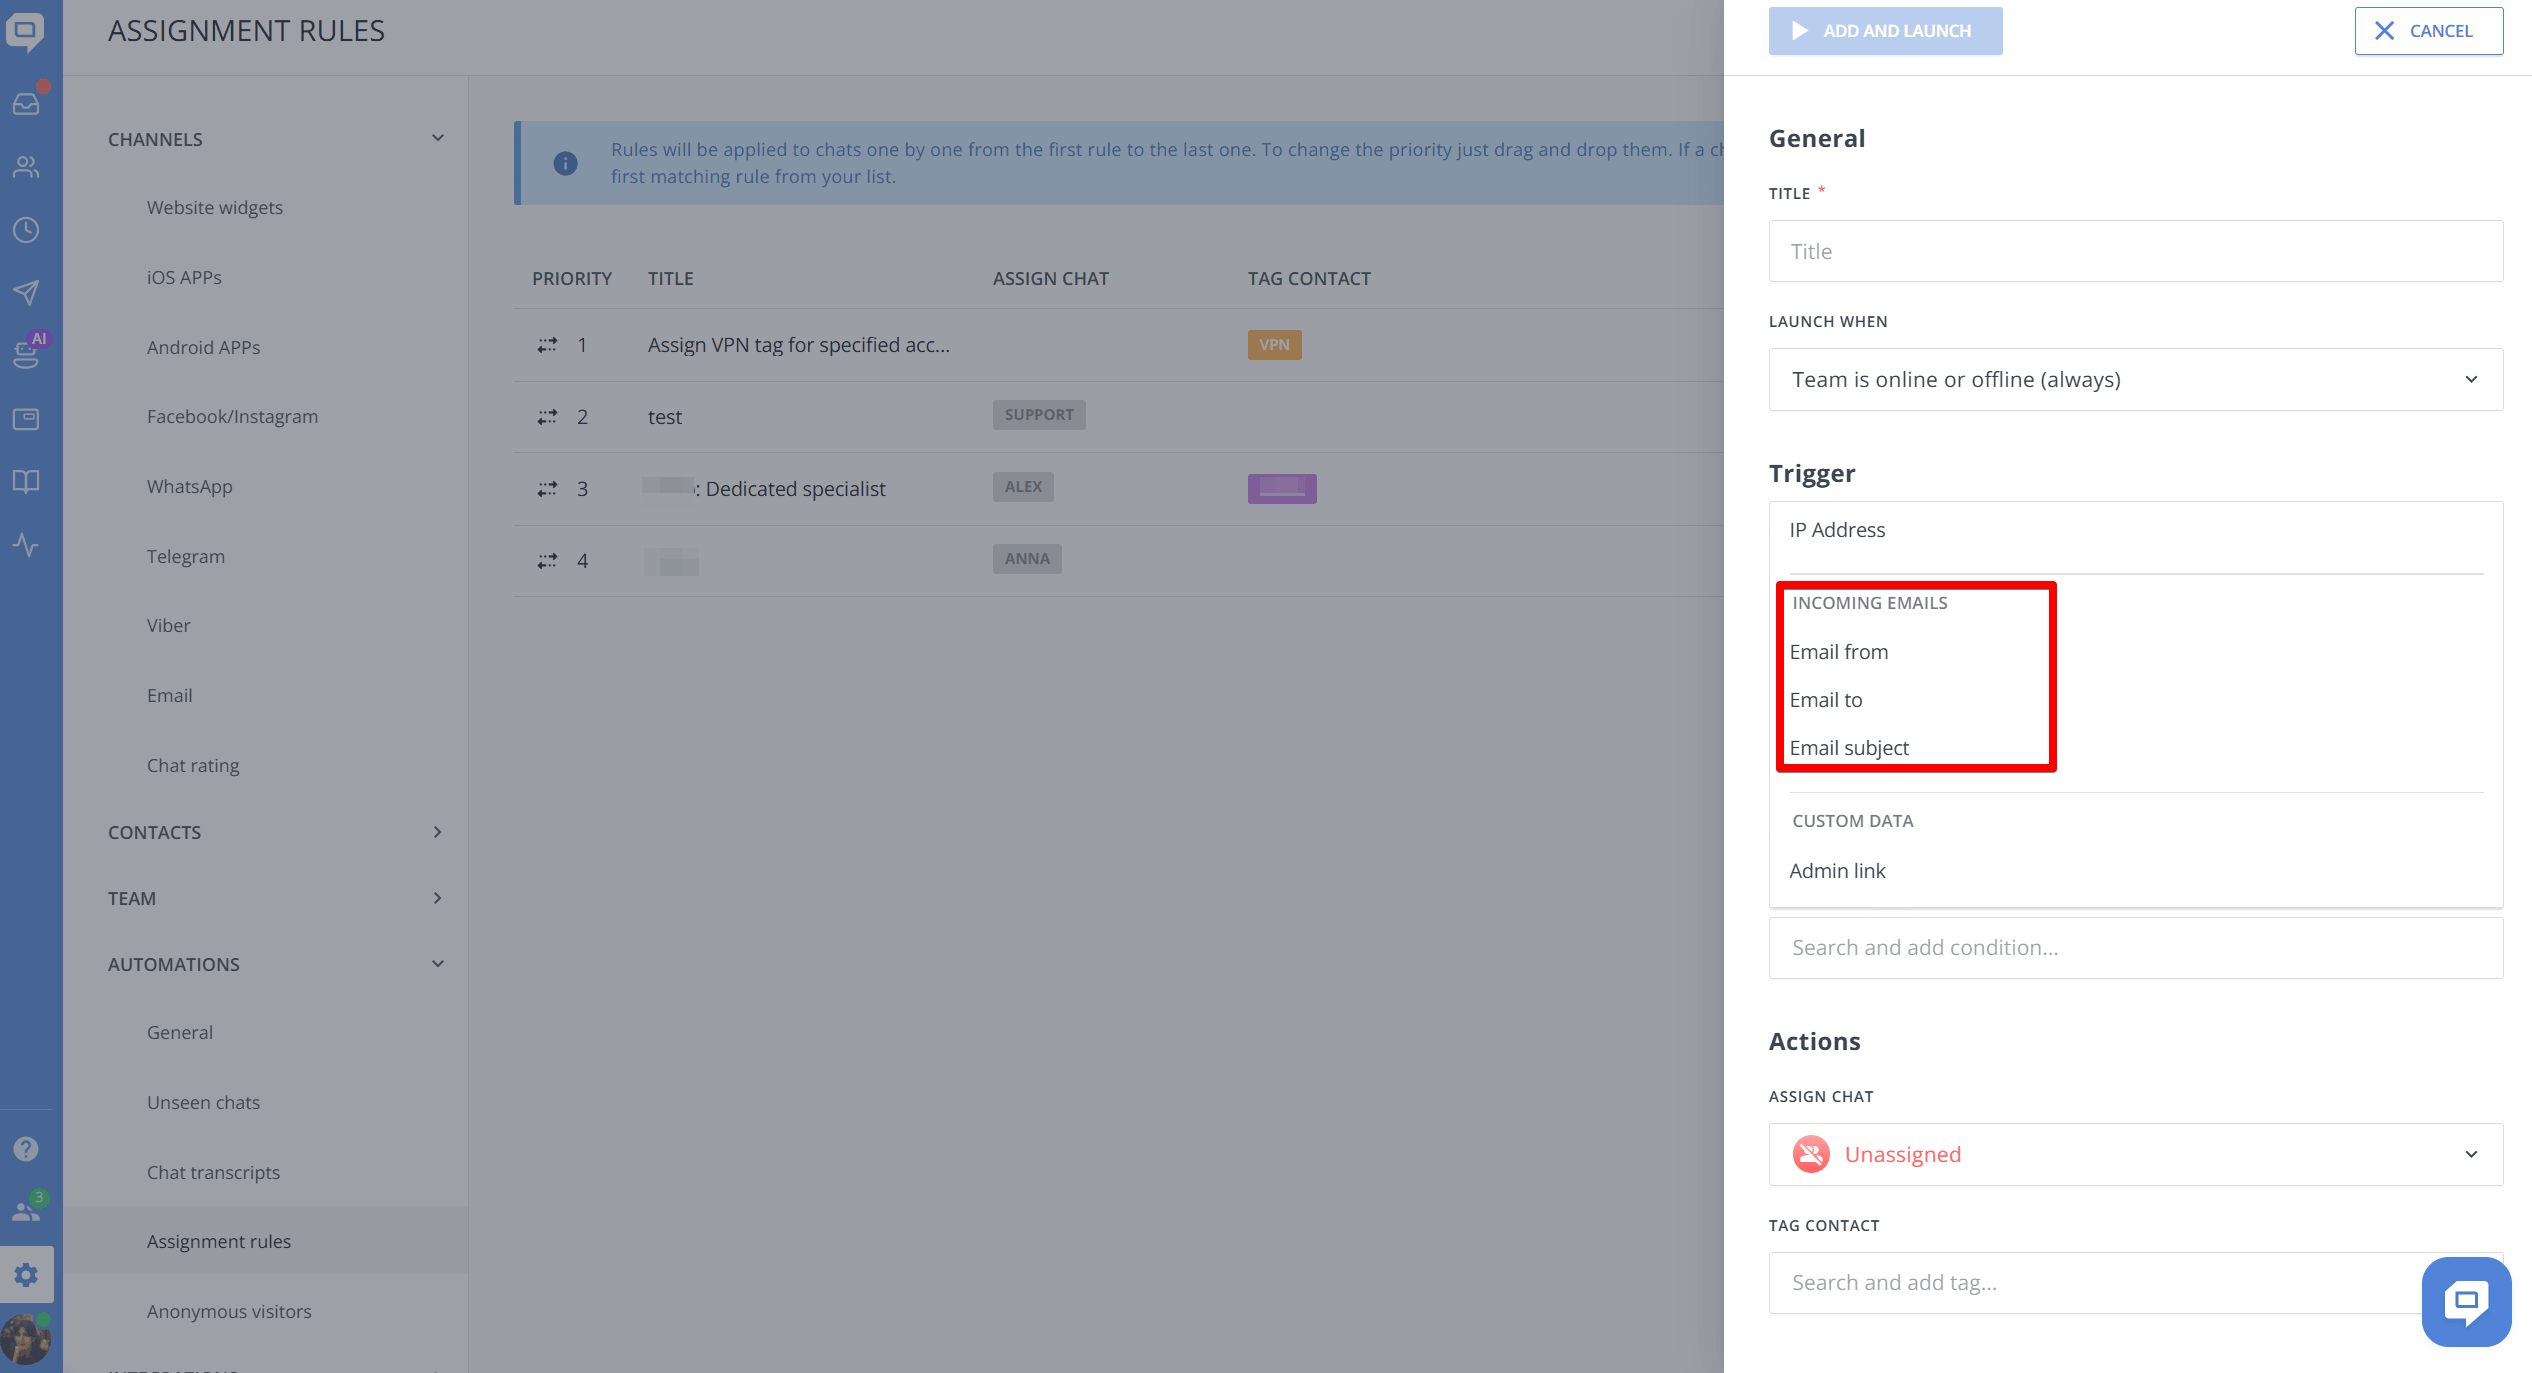
Just go to Settings → Automations → Assignment rules → Add new rule, and choose the needed option from the Conditions list (new Incoming emails conditions are between User information and Custom data) after clicking Add a condition.
For example, you can set assignment rules like Email to contains support or Email from equals [email protected], or choose any other combination.
📩 Use assignment rules for routing and tagging incoming emails
No matter how many email addresses your company uses, you can forward them all to the default email address in your HelpCrunch account, so that you can receive all the correspondence in one place.
Once all your emails are forwarded to HelpCrunch, you can assign incoming letters to specific agents or departments by the recipient address, like support, sales, or marketing. For example, you can set up the emails sent to [email protected] to go to the sales department you created earlier or your sales manager’s inbox.
Secondly, you can assign a specific department or agent to receive emails from a particular client (say, they worked with them before or know the specifics of the industry).
Finally, you can set up assignment rules to route messages with specific keywords in the subject line to designated team members or departments. For example, you can indicate that the Email subject contains problem should be assigned to your team member Chris. If someone sends you an email with the subject line “Platform login problem”, it will automatically fall into Chris’s inbox.
You can also add tags to contacts for each assignment rule. For instance, you can apply a Leads tag to contacts who sent an email to [email protected], making those contacts easier to identify and filter later. As an option, you can use tags to create audience segments for Auto messages.
📬 Introduce assignment rules for email fields to create separate inboxes
As mentioned earlier, you can now assign emails based on their to/from addresses or subject line not only to different people, but also to departments. This allows you to have separate inboxes and avoid chaos in your shared inbox.
You just need to create a new department in Settings → Team → Departments, which you may call “Tech Support”, add all the team members specializing in tech questions there, and select this department when creating a new assignment rule for emails, say, incoming emails that have “issue” in their subject line or ones sent to your [email protected] email.
Now, you have a separate inbox for the Tech Support department. For more precise automation, you can create custom inboxes and combine department filters with other criteria.
📊 Get reporting for incoming emails
Here is an extra trick: because you can assign incoming emails to specific departments, you can also get detailed reporting for each of these departments and, as a result, learn more about the workload, response time, or even compare the volume of customer requests for each department and, thus, topic.
You can track the performance of a specific department in Reports → Inbox → Departments.
📮 Email tab behavior setting
To help you get the most out of email as a channel, we also added a new behavior setting for the Email tab in the Inbox editor.
It sets what the Email tab is pre-filled with when you open a chat in the Inbox.
You can find it in My Account → Email settings → Composing emails.
It works individually for each agent, so every team member can choose their preferred behavior.
There are two options to choose between:
- New email is the default option. When chosen, the Email tab contains the Default email subject and an empty email body.
- Reply to the last customer email automatically fetches the customer’s last email and replies to it. Your reply uses the subject from the customer’s last email and quotes their message.
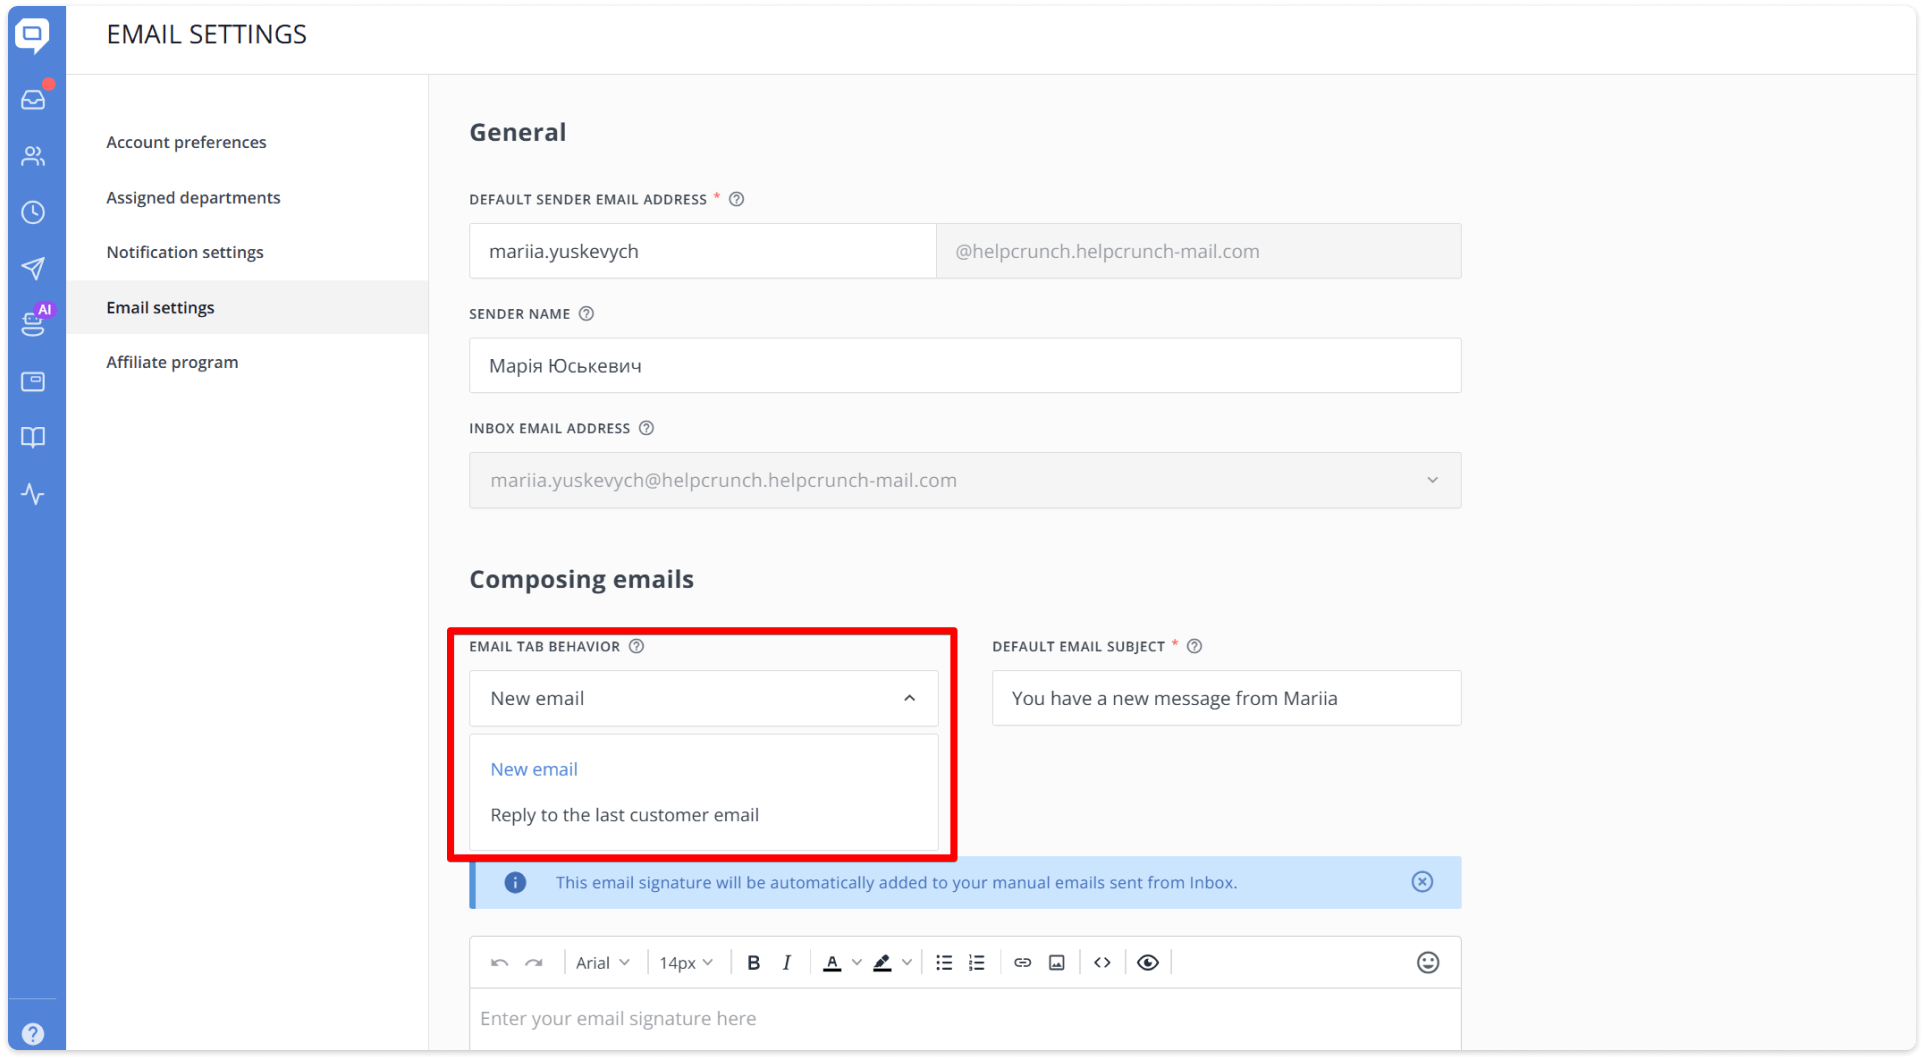
If there are no emails from the customer in the chat yet, your message will automatically act as a New email.
Note that you can’t disable the Default email subject. It always works, whether as the default option for New email or as a fallback for Reply to the last customer email if there are no email messages from the customer yet. Of course, you can write your unique Default email subject and change it when needed.
To round things up, we also gave the Email settings page a complete UX overhaul to make it easier to navigate.
Enjoy!
Read Also
👥 Individual team member display settings per widget
Managing several brands or products? Choose which team members appear in each chat widget and hide offline ones. See what changed and how to set it up.
📖 Accordions, snippet callouts, and auto-logout for Knowledge base
Two new formatting tools in the Knowledge base editor, plus auto-logout for password-protected knowledge bases, smoother widget access, and minor fixes for iOS SDK.
📱 Mobile cleanup: New chat search in apps & SDK stability
Our mobile stack just got a serious cleanup. Enjoy a brand-new chat search in the HelpCrunch Inbox apps, improved message reliability, and a load of SDK stability fixes.
